Tying knots is the act of using methods or techniques to bind, secure, or fasten ropes. Throughout the process of evolution and development, humans have created numerous knots applicable in various situations to efficiently address human problems. Below is a compilation of 20 common knots for ropes:
- Single Bowline
- Double Bowline
- Figure Eight Knot
- Bowline on a Bight
- Bowline knot
- Slipknot
- Sheet Bend
- Cow Hitch
- Weaver's Knot
- Weaver's Knot with a Bow
- Fisherman's Knot
- Fisherman's Knot with a Bow
- Carrick Bend
- Double Carrick Bend
- Taut-line Hitch (for tent lines)
- Clove Hitch
- Lark's Head (for tent lines)
- Timber Hitch
- Clove Hitch on a Bight
- Bowline (Emergency Bowline)
Detail
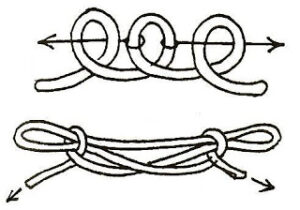
Single Bowline
The Single Bowline is a simple knot-tying technique used to join two pieces of rope together. Here are detailed instructions for you to tie the Single Bowline knot:
- Step 1: Place two pieces of rope on top of each other, forming a loop or a knot.
- Step 2: Take the left rope over the right rope and pull it through to the front.
- Step 3: Take the right rope over the left rope and pull it through to the front, passing through the U-shaped loop created by the two ropes.
- Step 4: Tighten the knot by repeating the above procedure. Ensure the knot is securely tightened and guarantees the knot's strength.

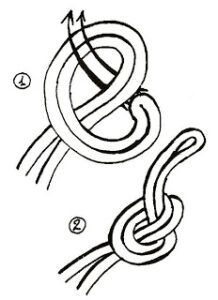
Double Bowline
The Double Bowline is a knot used to join two pieces of rope together. It creates a strong and reliable connection. Here are detailed instructions for you to tie the Double Bowline knot:
- Step 1: Place two parallel ropes, slightly overlapping each other.
- Step 2: Take the left rope over the right rope, forming a loop or knot.
- Step 3: Take the right rope over the left rope, passing through the loop or knot you created in the previous step.
- Step 4: Tighten both ropes to secure the Double Bowline knot. Make sure to pull each rope towards the end of the knot to ensure its stability.
- Step 5: Test the strength of the Double Bowline knot by pulling both ropes. If the knot holds tight and doesn't slip, you have successfully tied the knot.
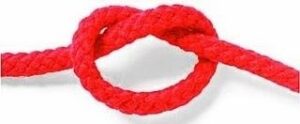
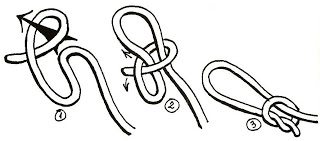
The Figure Eight Knot is a simple and common type of knot. It is often used to connect two ropes or cables. Here are basic instructions for you to tie the Figure Eight Knot:
- Step 1: Place two ropes on top of each other to create a horizontal X.
- Step 2: Take the left rope, which is above, and pull it over the right rope, which is below, going from the top down and through the hole at the bottom.
- Step 3: Take the right rope, which is above, and pull it over the left rope, which is below, going from the bottom up and through the hole at the top.
- Step 4: Tighten the knot by repeating the above procedure. Ensure the knot is securely tightened and guarantees the knot's strength

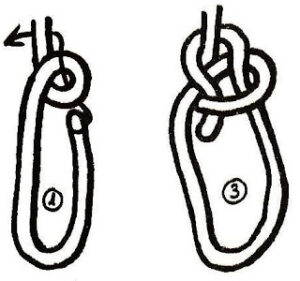
Bowline on a Bight
The Bowline Knot is a type of knot widely used in rock climbing, mountaineering, and other climbing activities. This knot creates a sliding loop that can be easily adjusted for length. Here are instructions for you to tie the Bowline Knot:
- Step 1: Place the rope around a post, bar, or material you want to fasten. The long end of the rope will be the "main strand," and the short end will be the "small strand."
- Step 2: Take the main strand of the rope, create a loop over the small strand, and pull it through to the front, forming a loop knot.
- Step 3: Pull the main strand of the rope through the loop knot once again, creating a new loop.
- Step 4: Pass the main strand of the rope over and through the second loop from underneath.
- Step 5: Tighten the knot by pulling both the main and small strands of the rope. Adjust the length of the knot by pulling the small strand of the rope.
Bowline knot
The Bowline knot is a type of knot widely used in rock climbing, mountaineering, and other climbing activities. This knot has the ability to self-lock under pressure and provides a secure and reliable connection. Here are instructions for you to tie the Bowline knot:
- Step 1: Pass the rope over a column, bar, or material that you want to fasten. The long section of the rope will be the "main strand," and the short section will be the "small strand."
- Step 2: Take the main strand of the rope, create a loop over the small strand, and pull it through to the front, forming a loop knot.
- Step 3: Take the main strand of the rope, pull it through the loop knot once again, but this time, pass through from behind and through the loop from bottom to top.
- Step 4: Pull the main strand of the rope over and through the loop once again from top to bottom.
- Step 5: Tighten the knot by pulling both the main and small strands of the rope. The knot will self-lock under pressure.
Slipknot
Slipknot is a simple type of knot used in various activities such as tying shoelaces, suspending objects on a rope, or creating a loop to hook onto a peg or an eyelet. Here are the instructions for you to tie the slipknot:
- Step 1: Pass the rope through the object to be fastened or create a loop.
- Step 2: Take the rope over and through the U-shaped hole formed by the rope and the object to be fastened.
- Step 3: Take the rope over and through the U-shaped hole again, but this time going from the front of the knot to the back.
- Step 4: Tighten the knot by pulling both ends of the rope. Ensure the knot is securely fastened.
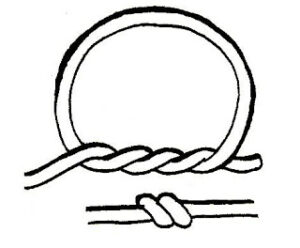
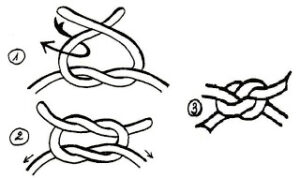
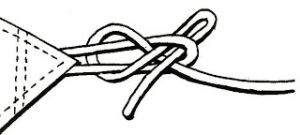
Sheet Bend
The Sheet Bend is a simple type of knot commonly used to attach two ropes together. It is a quick and easy way to tie a knot. Here are the instructions for you to tie the Sheet Bend:
- Step 1: Place the two ends of the ropes close together, forming a straight line.
- Step 2: Take the end of the left rope and pull it over the end of the right rope, creating a loop.
- Step 3: Take the end of the right rope and pull it over the end of the left rope, passing through the loop you created in the previous step.
- Step 4: Tighten both ends of the rope to secure the Sheet Bend. Make sure to push each end towards the knot to ensure its stability.

Cow Hitch
The Cow Hitch is a simple and reliable type of knot. It is widely used in outdoor activities, camping, hiking, backpacking, and maritime settings. The Bowline knot has the ability to withstand high loads and is easily adjustable. Here are the basic instructions to tie the Cow Hitch:
- Step 1: Pass the rope through the object to be fastened or create a loop.
- Step 2: Take the rope over and through the loop, going from the top down.
- Step 3: Take the rope over and through the loop again, but this time going from the bottom up.
- Step 4: Tighten the knot by pulling the main strand and the small strand (the strand going from the top down).
- Step 5: Adjust the tightness of the Bowline knot by pulling the small strand (the strand going from the top down).
Weaver's Knot
The Weaver's Knot is a type of decorative knot created by weaving strands of cord together. It has a pattern resembling a net or a woven fabric. The Weaver's Knot is often used in decorations, jewelry, and can even be used for lacing shoes. Here are the basic instructions to tie the Weaver's Knot:
- Step 1: Prepare two strands of cord or thread of the required length.
- Step 2: Place the first strand (cord A) horizontally across the second strand (cord B), creating a loop across cord B.
- Step 3: Take cord A over and through the loop it created from underneath.
- Step 4: Take cord A over and through the loop again, but this time going from the top down.
- Step 5: Tighten the knot by pulling both ends of cords A and B. Ensure to push each end towards the knot to create a weaving effect.
- Step 6: Repeat the steps above to create additional loops and form a net or woven fabric according to your preference.\

Weaver's Knot with a Bow
The Weaver's Knot with a Bow knot is used in the craft of weaving to securely and aesthetically connect strands of cord or thread.
Here are the basic instructions for you to tie the living weaver's knot:
- Step 1: Prepare two strands of cord or thread of the required length.
- Step 2: Place the first strand (cord A) horizontally across the second strand (cord B) and create a loop around cord B.
- Step 3: Take cord A over and through the loop it created from underneath.
- Step 4: Take cord A over and through the loop again, but this time going from the top down.
- Step 5: Tighten the knot by pulling both ends of cords A and B. Ensure to push each end towards the knot to make the weaving knot tight and aesthetically pleasing.
- Step 6: Repeat the steps above to create additional loops and continue connecting strands of cord or thread according to your preference.
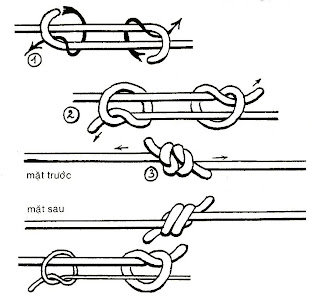
Fisherman's Knot
Fisherman's Knot is a type of knot used in the weaving craft to securely and aesthetically join two strands of fishing line. It is employed in connecting fishing lines when weaving or embroidering. Below is a basic guide on how to tie a fishing knot:
- Step 1: Prepare two ends of the fishing line that you want to join.
- Step 2: Place the first end of the fishing line (Line A) across the second end of the fishing line (Line B) and create a loop around Line B.
- Step 3: Bring Line A over the top and pass it through the loop it created from underneath.
- Step 4: Bring Line A over the top and pass it through the loop again, but this time from the top down.
- Step 5: Tighten the knot by pulling both ends of Line A and Line B. Ensure to push each end towards the knot's head to make the fishing knot tight and visually pleasing.
- Step 6: After the knot has been securely tied, trim any excess line ends (if any) to make the knot neat and obstruction-free.
Fisherman's Knot with a Bow
Fisherman's Knot with a Bow is a method of joining two threads together to create a tight and durable connection. This technique is commonly used in weaving to join threads without leaving marks or distortions in the weaving pattern.
Here is a basic guide on how to tie the lock stitch:
- Step 1: Prepare two ends of the thread that you want to join.
- Step 2: Place the first end of the thread (Thread A) across the second end of the thread (Thread B) and create a loop around Thread B.
- Step 3: Bring Thread A over the top and pass it through the loop it created from underneath.
- Step 4: Bring Thread A over the top and pass it through the loop again, but this time from the top down.
- Step 5: Bring Thread A across the head of the second thread (Thread B) and create a loop around Thread B once more.
- Step 6: Bring Thread A over the top and pass it through the loop it created from underneath.
- Step 7: Bring Thread A over the top and pass it through the loop again, but this time from the top down.
- Step 8: Tighten the knot by pulling both ends of Thread A and Thread B. Ensure to push each end towards the knot's head to make the lock stitch tight and durable.
- Step 9: After the knot has been securely tied, trim any excess thread ends (if any) to make the knot neat and obstruction-free.

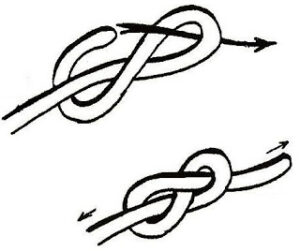
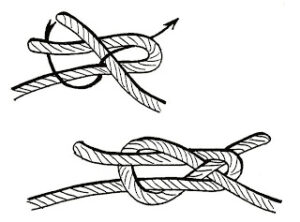
Carrick Bend
The Carick Bend is a knot used to join two ropes together. It creates a secure knot and is often used in activities such as rock climbing, underwater sports, and camping. Here is a guide on how to tie the Carick Bend:
- Step 1: Place two rope ends parallel to each other.
- Step 2: Take the left rope end and make a loop around the right rope end, going from the top down. Then, pass the left rope end through this loop from underneath to the top.
- Step 3: Take the right rope end and make a loop around the left rope end, going from the top down. Then, pass the right rope end through this loop from underneath to the top.
- Step 4: Tighten the knot by pulling both rope ends. Ensure that the knot is securely tightened.
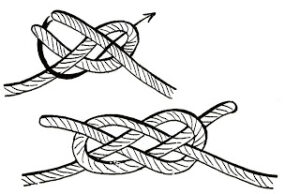
Double Carrick Bend
The Double Carick Bend is essentially a variation of the Carick Bend but is performed twice to create a more secure double connection. Here is a guide on how to tie the Double Carick Bend:
- Step 1: Place two rope ends parallel to each other.
- Step 2: Take the left rope end and make a loop around the right rope end, going from the top down. Then, pass the left rope end through this loop from underneath to the top.
- Step 3: Take the right rope end and make a loop around the left rope end, going from the top down. Then, pass the right rope end through this loop from underneath to the top.
- Step 4: Repeat Steps 2 and 3 once more. In other words, create another loop around the right rope end with the left rope end, and create another loop around the left rope end with the right rope end.
- Step 5: Tighten the knot by pulling all four rope ends. Ensure that the knot is securely tightened.
Taut-line Hitch (for tent lines)
Taut-line Hitch (for tent lines) is a type of knot used to secure and tension straps or ropes in the process of setting up a tent or traditional outdoor structures. It helps secure the guy lines, creating tension and shaping the tent or similar structure. Here is a guide on how to tie the Tarp Hitch:
- Step 1: Place a piece of rope or cable around the object you want to secure, such as a tent pole or a tree.
- Step 2: Take the left end of the rope and pass it over the running line from left to right.
- Step 3: Next, pass the left end through the running line vertically from top to bottom.
- Step 4: Twist the left end of the rope over the running line horizontally once again from right to left.
- Step 5: Finally, pass the left end of the rope through the running line vertically once again from bottom to top.
- Step 6: Tighten the knot by pulling both ends of the rope. Ensure that the knot is securely tightened, and the rope is taut.
Clove Hitch
Clove Hitch is one of the most basic and widely used knots in boating, camping, mountaineering, and outdoor activities. It creates a non-slip loop and is secure when tightened. Here are the instructions for tying a bowline knot:
- Step 1: Create a loop by taking the end of the rope and placing it over the remaining part of the rope, forming a "q" (or "p") shape in the middle of the loop.
- Step 2: Pass the end of the rope through the loop from underneath.
- Step 3: Pass the end of the rope through the section of the rope forming the loop and then through the inside of the loop created in the previous step.
- Step 4: Thread the end of the rope through the loop created in step 1.
- Step 5: Tighten the knot by pulling both the main part of the rope and the end of the rope serving as the "handle" of the knot. Ensure that the knot is securely tightened.
Lark's Head (for tent lines)
Lark's Head (for tent lines) is a type of knot used to create a non-slip loop. It is commonly used in activities such as rock climbing, high-altitude sports, and camping. Here are the steps to tie a pigeon loop:
- Step 1: Place the end of the rope around the object you want to secure or create a loop around your hand.
- Step 2: Take the end of the rope and pass it over the loop you created, forming a small loop in the shape of a "q" (or "p") above the larger loop.
- Step 3: Pass the end of the rope through the small loop from the inside out.
- Step 4: Guide the end of the rope through the section of the rope forming the larger loop.
- Step 5: Push the end of the rope through the small loop created in step 2.
- Step 6: Tighten the knot by pulling both the main part of the rope and the end of the rope acting as the "tail" of the knot. Ensure that the knot is securely tightened for safety.
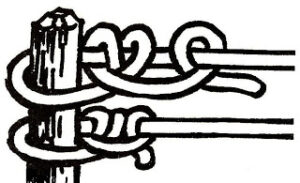
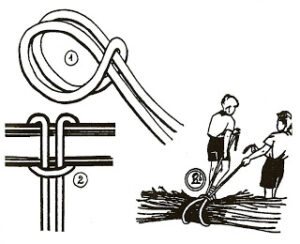
Timber Hitch
Used for pulling wood, with tightening functionality like a slip knot.
Applications include stretching clotheslines or attaching a hammock to a tree trunk.
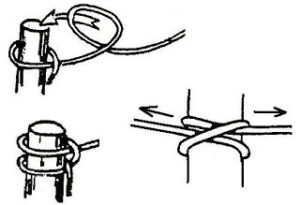
Clove Hitch on a Bight
It is also known as the Nightingale's Head knot. It is a type of knot used for suspension. Its purpose is to hang an object on a horizontal bar.
Applications: making a swing chain, hanging bundles of firewood, erecting flagpoles, tying bungee cords, decorative crocheting, or creating wristbands using cords...
Bowline (Emergency Bowline)
The single loop knot, also known as the emergency loop knot, is a simple yet highly useful knot in emergency situations or outdoor activities such as climbing, hiking, travel, or sports. This knot can be used to create a loop around an object or to make a 'seat' for someone to sit or hang.
Here is how to tie a single loop knot:
- Step 1: Pass the end of the rope around an object or through a fixed point, forming a loop.
- Step 2: Thread the end of the rope through the loop from below.
- Step 3: Pass the end of the rope through the portion of the loop, then through the inside of the loop created in the previous step.
- Step 4: Push the end of the rope through the loop created in Step 1.
- Step 5: Tighten the knot by pulling both the main part of the rope and the end of the rope, with the end of the rope acting as the 'handle' of the knot. Ensure that the knot is securely tightened.