
- 1800 6129

Each climbing knot has a different purpose. Alpine Butterfly creates a loop in the middle of a rope, Double Fisherman’s Knot joins two rope ends, and Figure Eight Follow Through is commonly used to tie into a climbing harness. This guide covers how to practice and check five techniques, with animations you can follow step by step. Let’s explore them with SIAM Brothers Vietnam...
Safety note: Use this article to practice tying knots on the ground. Before using a rope for climbing, rappelling, or rescue, learn from a qualified instructor and check your rope, harness, and other equipment against the manufacturers’ instructions. An ordinary utility rope must not be used as a substitute for a climbing rope.
In the instructions below, the working end is the part of the rope you move, wrap, or thread through a loop. The standing part is the longer section extending away from the knot. A bight is a folded section of rope that does not cross over itself. Beginners may find it easier to follow each strand by using a two-color practice rope or placing the rope against a contrasting background.
Choose a rope that is appropriate for the activity and compatible with the equipment involved. A rope used to practice knots on the ground is not necessarily suitable for climbing.
Before practicing, look for cuts, fraying, distortion, or contamination on the rope. After tying a knot, arrange its strands neatly, tighten each part, check the length of the remaining tail, and compare the result with the animation.
In actual climbing, checks must also cover the harness, equipment, connection points, and climbing partner. An online guide cannot replace a partner check before climbing.
Alpine Butterfly creates a fixed loop in the middle of a rope without needing access to either end. It can be useful when a connection point is needed along the rope. How that loop is used in a particular climbing system must follow the relevant technical guidance.
Lay the rope across your palm and wrap it twice around your hand, creating three strands alongside one another.
Lift the turn nearest your fingertips and pass it over the other two turns.
Slide the knot off your hand. Hold the new loop, then pull the loop and both sides of the standing rope to arrange and tighten the knot.
How to check it: The fixed loop should sit in the middle of the rope, with the strands neatly arranged and no unintended twists. Compare both sides of your finished knot with the animation.
Watch the steps: Alpine Butterfly animation.
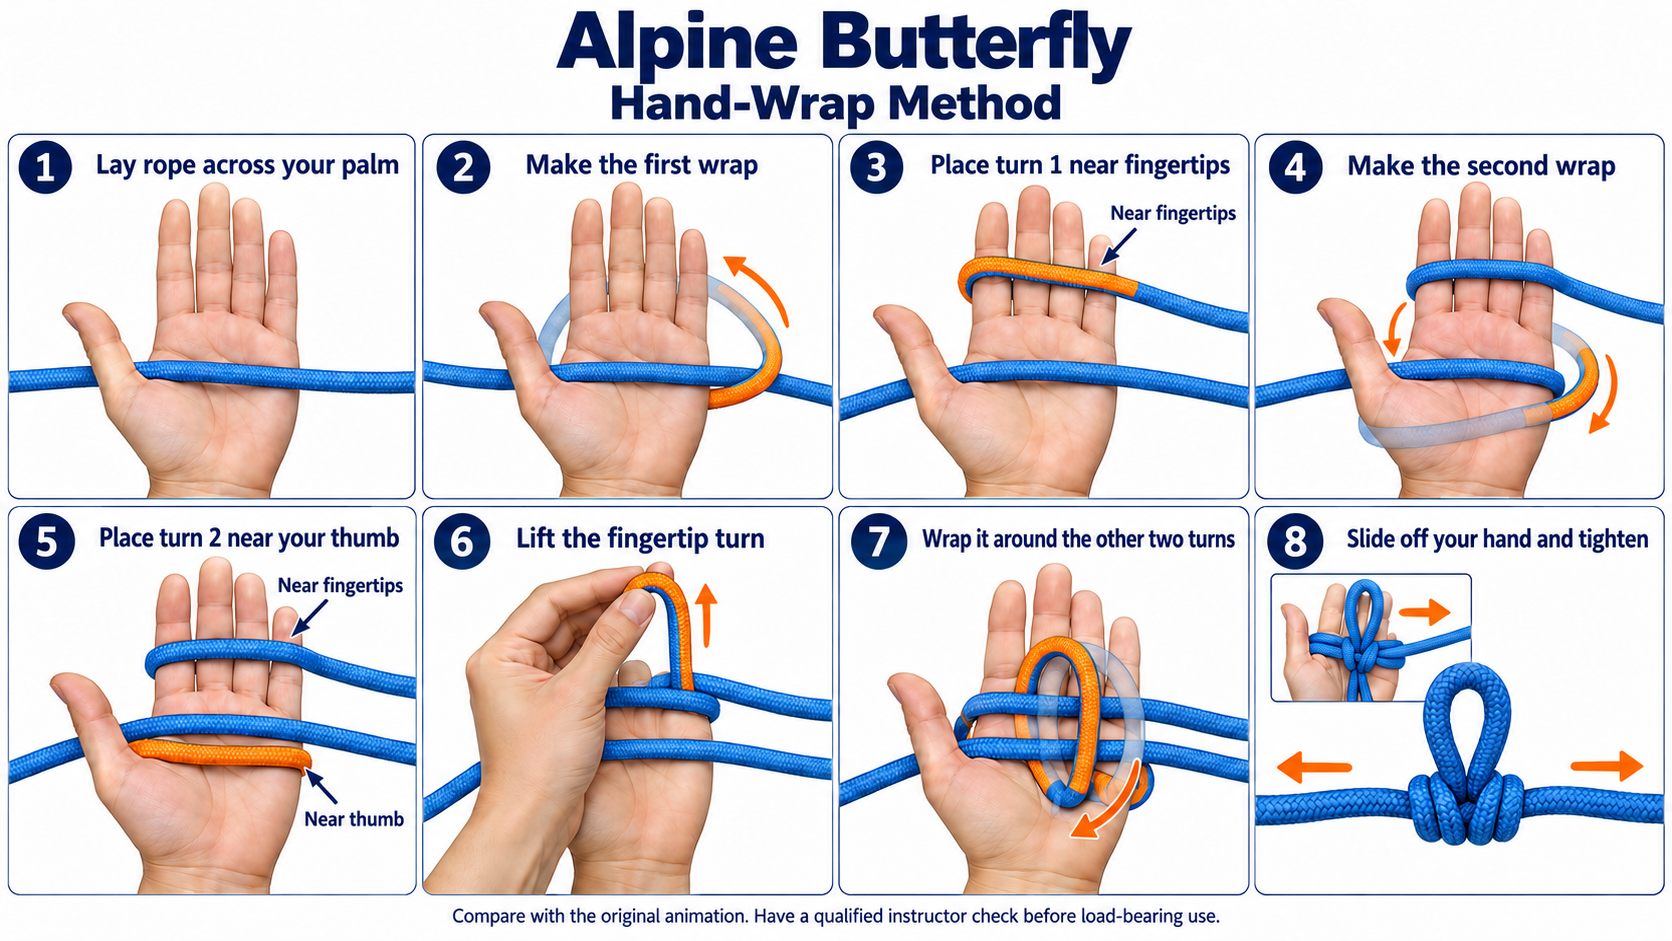
Alpine Butterfly - Source: SIAM Brothers Vietnam
Clove Hitch can be adjusted before it is tightened. The method below uses the working end to tie the knot around a round post, making the rope’s path easier to see.
In climbing, using Clove Hitch with a carabiner or as part of an anchor system requires separate instruction. The knot can slip or become difficult to untie under certain conditions. A single Clove Hitch should not be assumed suitable for every anchor.
Wrap the working end once around the post.
Cross it over the standing part at the front of the post, then wrap it around the post a second time.
Tuck the working end beneath the crossing strand at the front and pull both sides to tighten the knot around the post.
How to check it: You should see two turns around the post and a crossing strand at the front. For any load-bearing application, the direction of pull and any additional securing method must be checked against the instructions for the complete system.
Watch the steps: Clove Hitch rope-end animation.
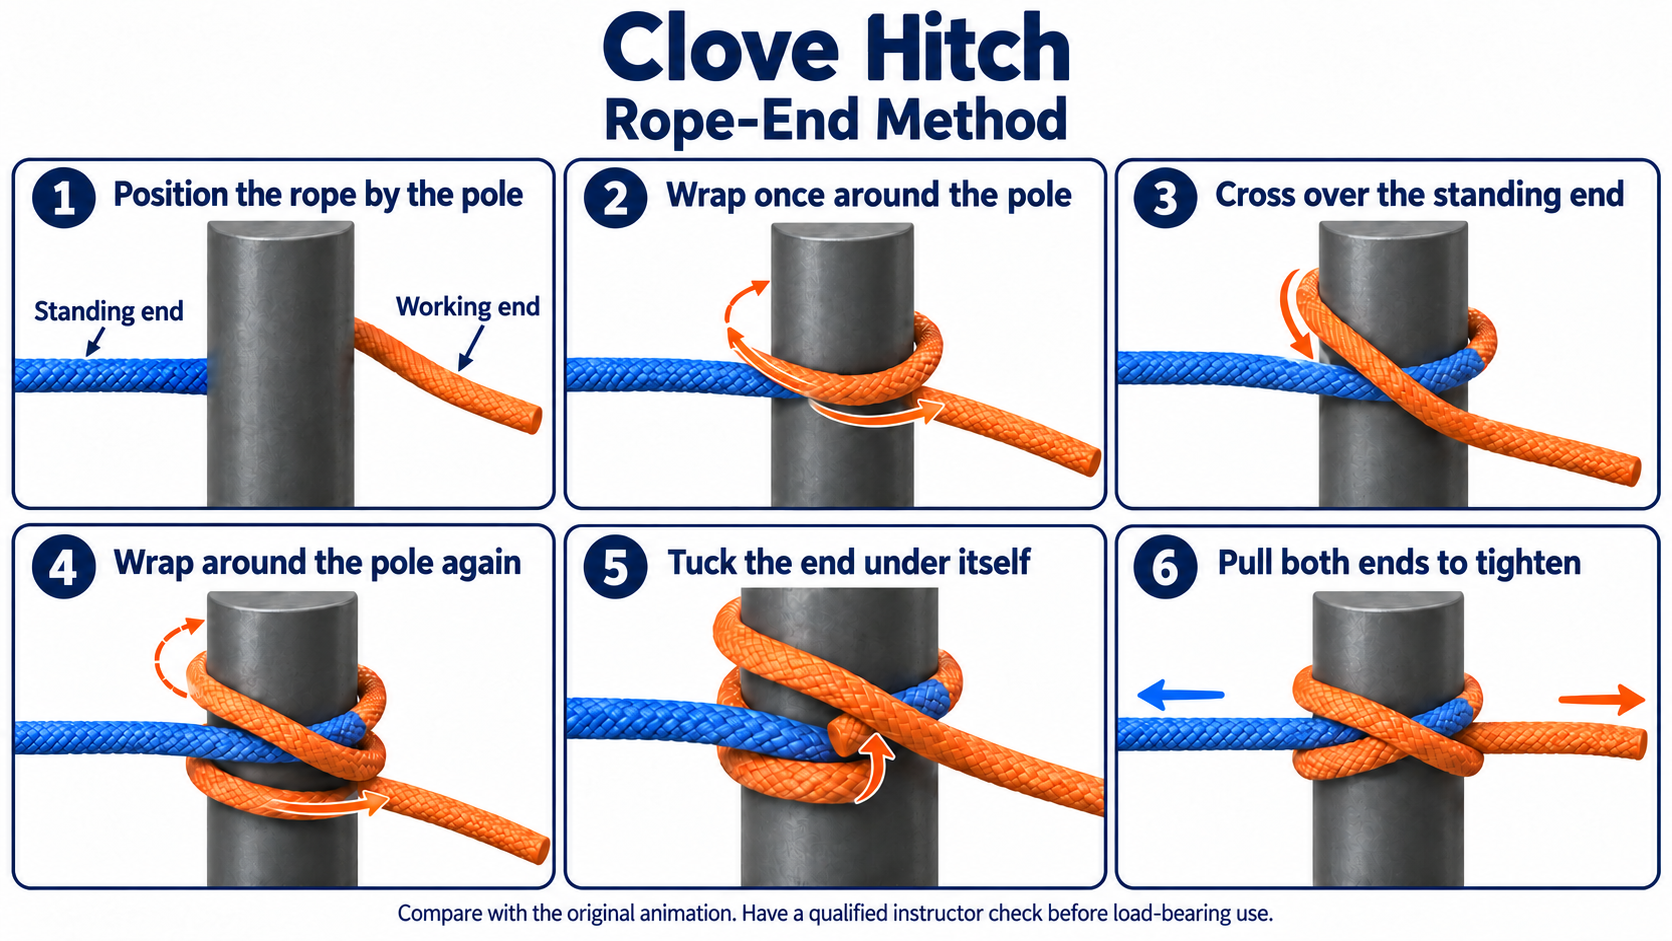
Clove Hitch Knot - Source: SIAM Brothers Vietnam
Double Fisherman’s Knot consists of two double-wrap knots, each gripping the opposite rope. One common use is joining the ends of an accessory cord to make a loop for certain Prusik techniques.
Whether the knot is suitable depends on the rope material, diameter, intended use, and applicable technical guidance. Animations may show short rope tails for clarity; do not treat their visible tail length as a standard for a load-bearing application.
Place the two rope ends alongside one another, pointing in opposite directions.
Wrap the first end twice around both strands. Pass that end back through the two turns and tighten the first knot.
Repeat the process with the second end on the opposite side.
Pull the standing parts of both ropes until the two knots slide together.
How to check it: The two double-wrap knots should sit firmly against each other, with each one gripping the opposite rope. Check the path of both ends and the remaining tail lengths against the requirements for the activity and rope.
Watch the steps: Double Fisherman’s Knot animation.
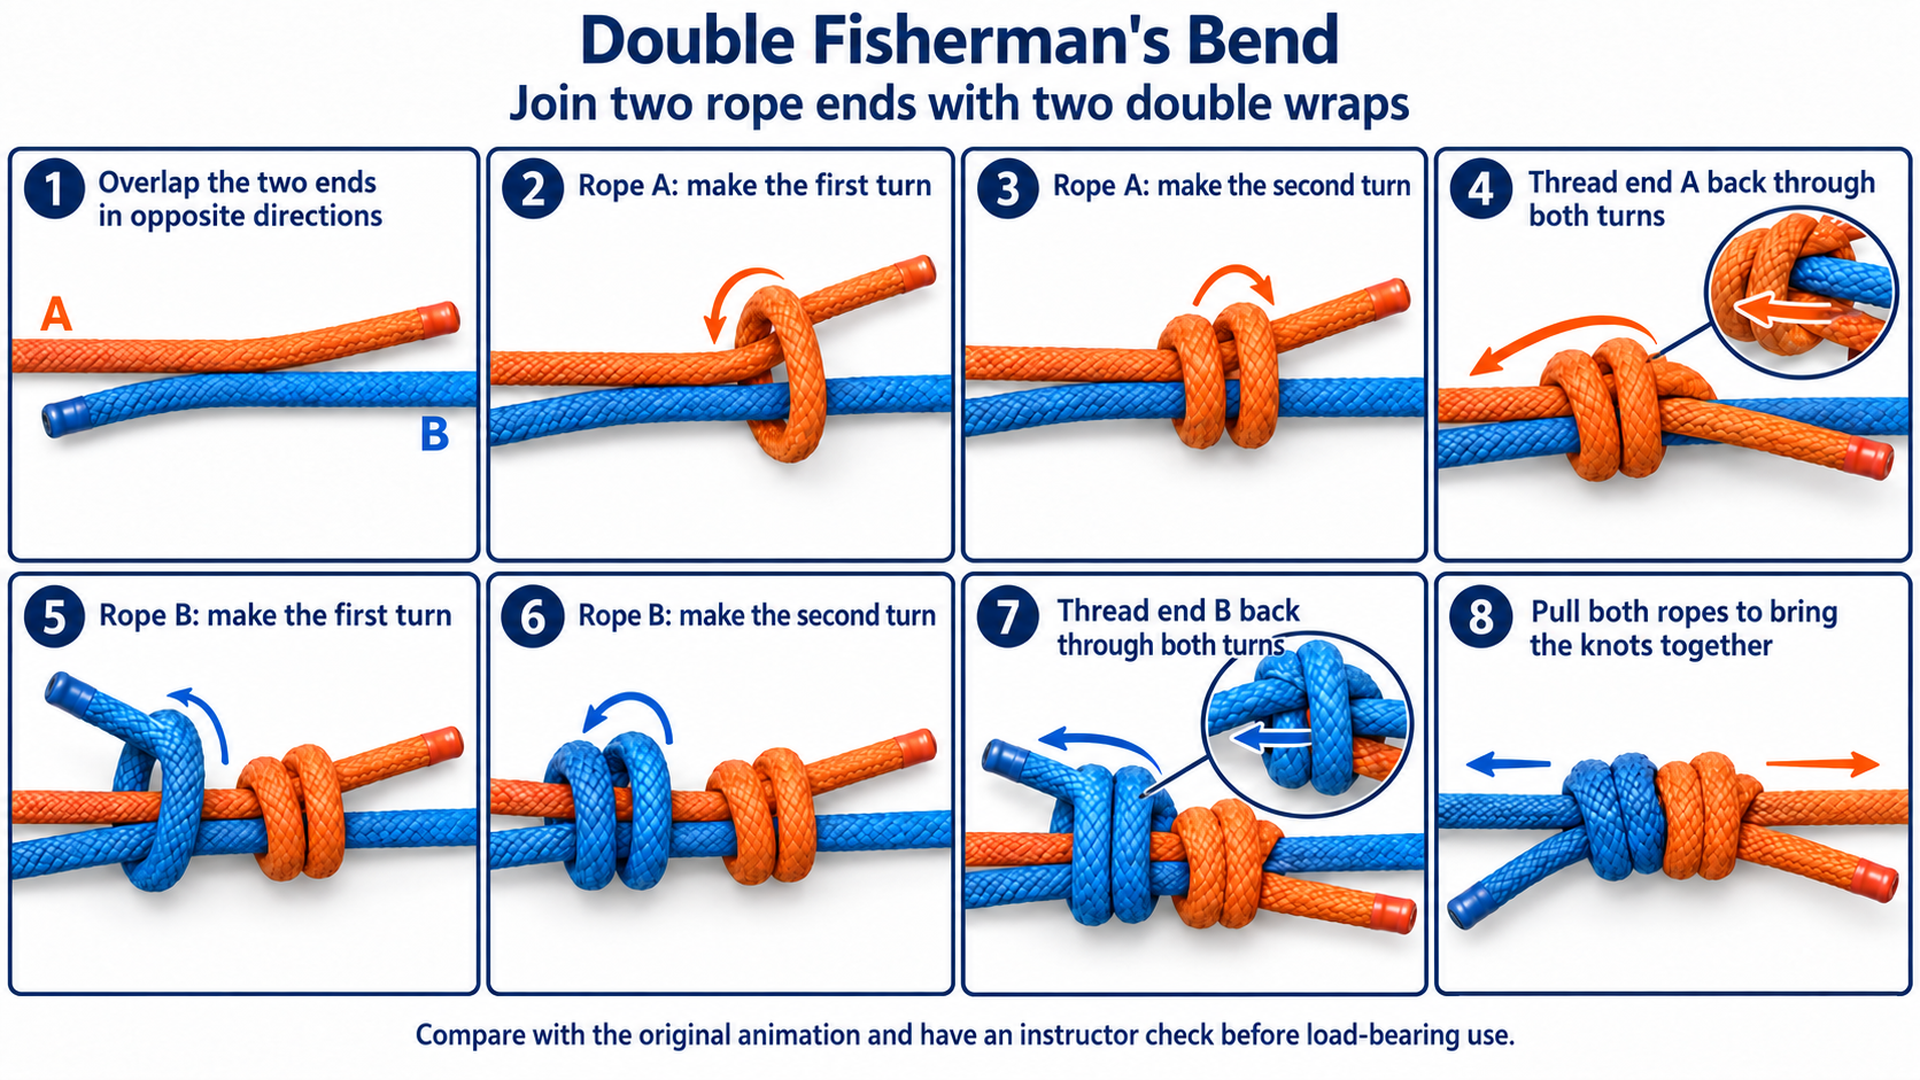
Double Fisherman’s Knot - Source: SIAM Brothers Vietnam
Figure Eight Follow Through creates a connection loop by retracing the path of an initial figure-eight knot. It is commonly used to tie a rope directly into a climbing harness.
The rope must pass through the tie-in points specified for the exact harness model being used. Do not guess the correct points from the appearance of gear loops or adjustment buckles.
Tie a loose figure-eight knot near the end of the rope, leaving enough rope to complete the remaining steps.
Pass the working end through the tie-in points specified by the harness manufacturer.
Thread the working end back through the figure-eight knot, retracing the original path in reverse so the strands lie beside one another.
Arrange the knot, tighten each strand, and check the remaining tail according to the instructions of your training provider and equipment manufacturer.
How to check it: Each part of the finished figure-eight should have two strands running side by side. Confirm that the rope passes through the correct harness tie-in points and that the knot is neatly arranged and tightened. The climber and belayer should check each other before starting.
Watch the steps: Figure Eight Follow Through animation.
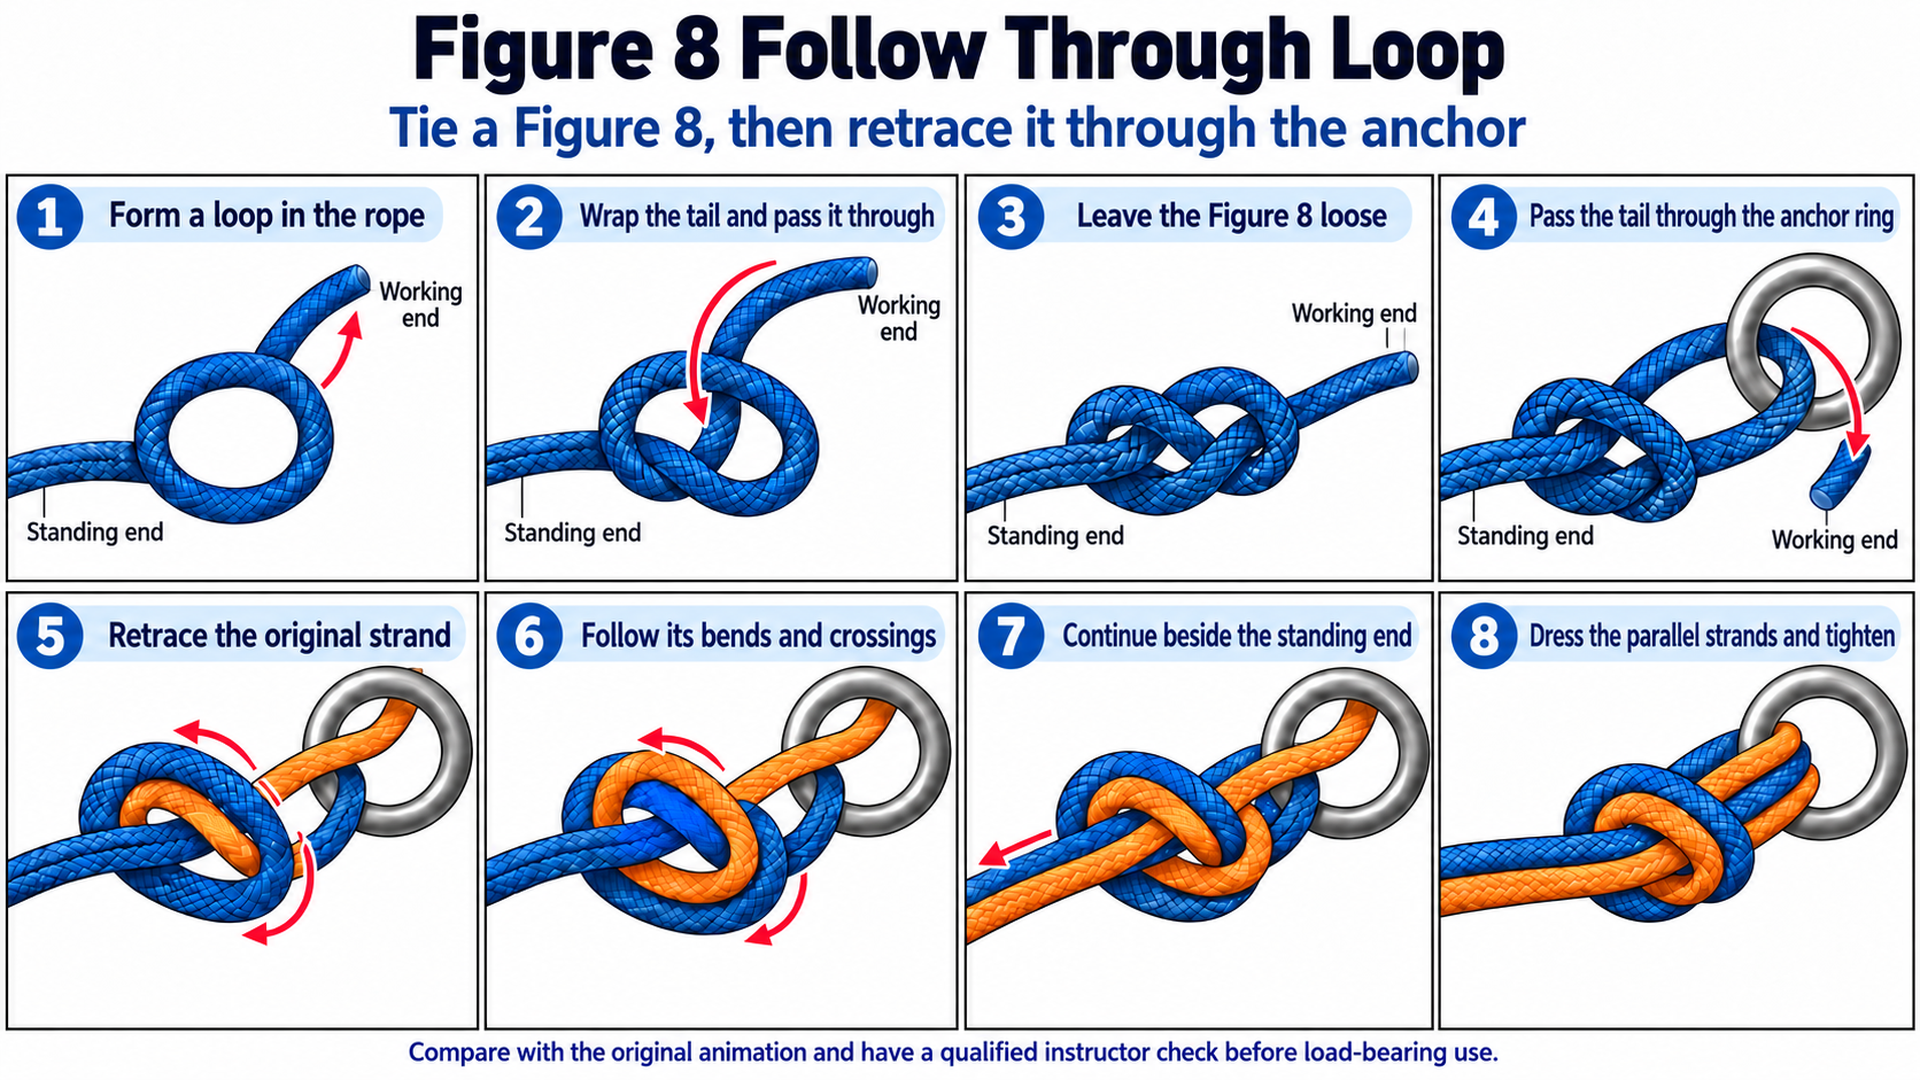
Figure Eight Follow Through - Source: SIAM Brothers Vietnam
Swiss Seat, also called a Rappel Seat, is an improvised harness made from rope or webbing in some rappel training and contingency situations. It is a process of arranging and tying rope around the body, rather than a single knot.
The sequence below follows a version described in a U.S. Army training document. Because the finished seat supports a person’s weight, practice it only under the direct supervision of a qualified instructor. Do not use this article alone to make a rope seat and rappel.
Find the midpoint of the rope, form a bight, and place it at the hip opposite your brake hand.
Bring the rope around your back and to the front. Wrap and adjust it around your waist as shown in the training material.
Pass both rope ends between your legs toward the back, making sure they do not cross.
Bring both ends over the waist rope at the sides of your hips, then adjust the seat so it fits snugly.
From behind, bring each rope end over its corresponding leg loop to form a securing hitch at each hip.
Bring the rope end on your brake-hand side across the front. Tie the ends at the opposite hip with a square knot, then secure each end with a backup overhand knot as described in the training material.
How to check it: The strands between the legs must not cross. There should be a securing hitch at each hip, with the finishing knot and backup knots in their specified positions. The remaining rope tails must meet the training requirements. An instructor must check the complete rope seat, equipment, and connections before it supports a person.
Watch and compare: Swiss Seat animation
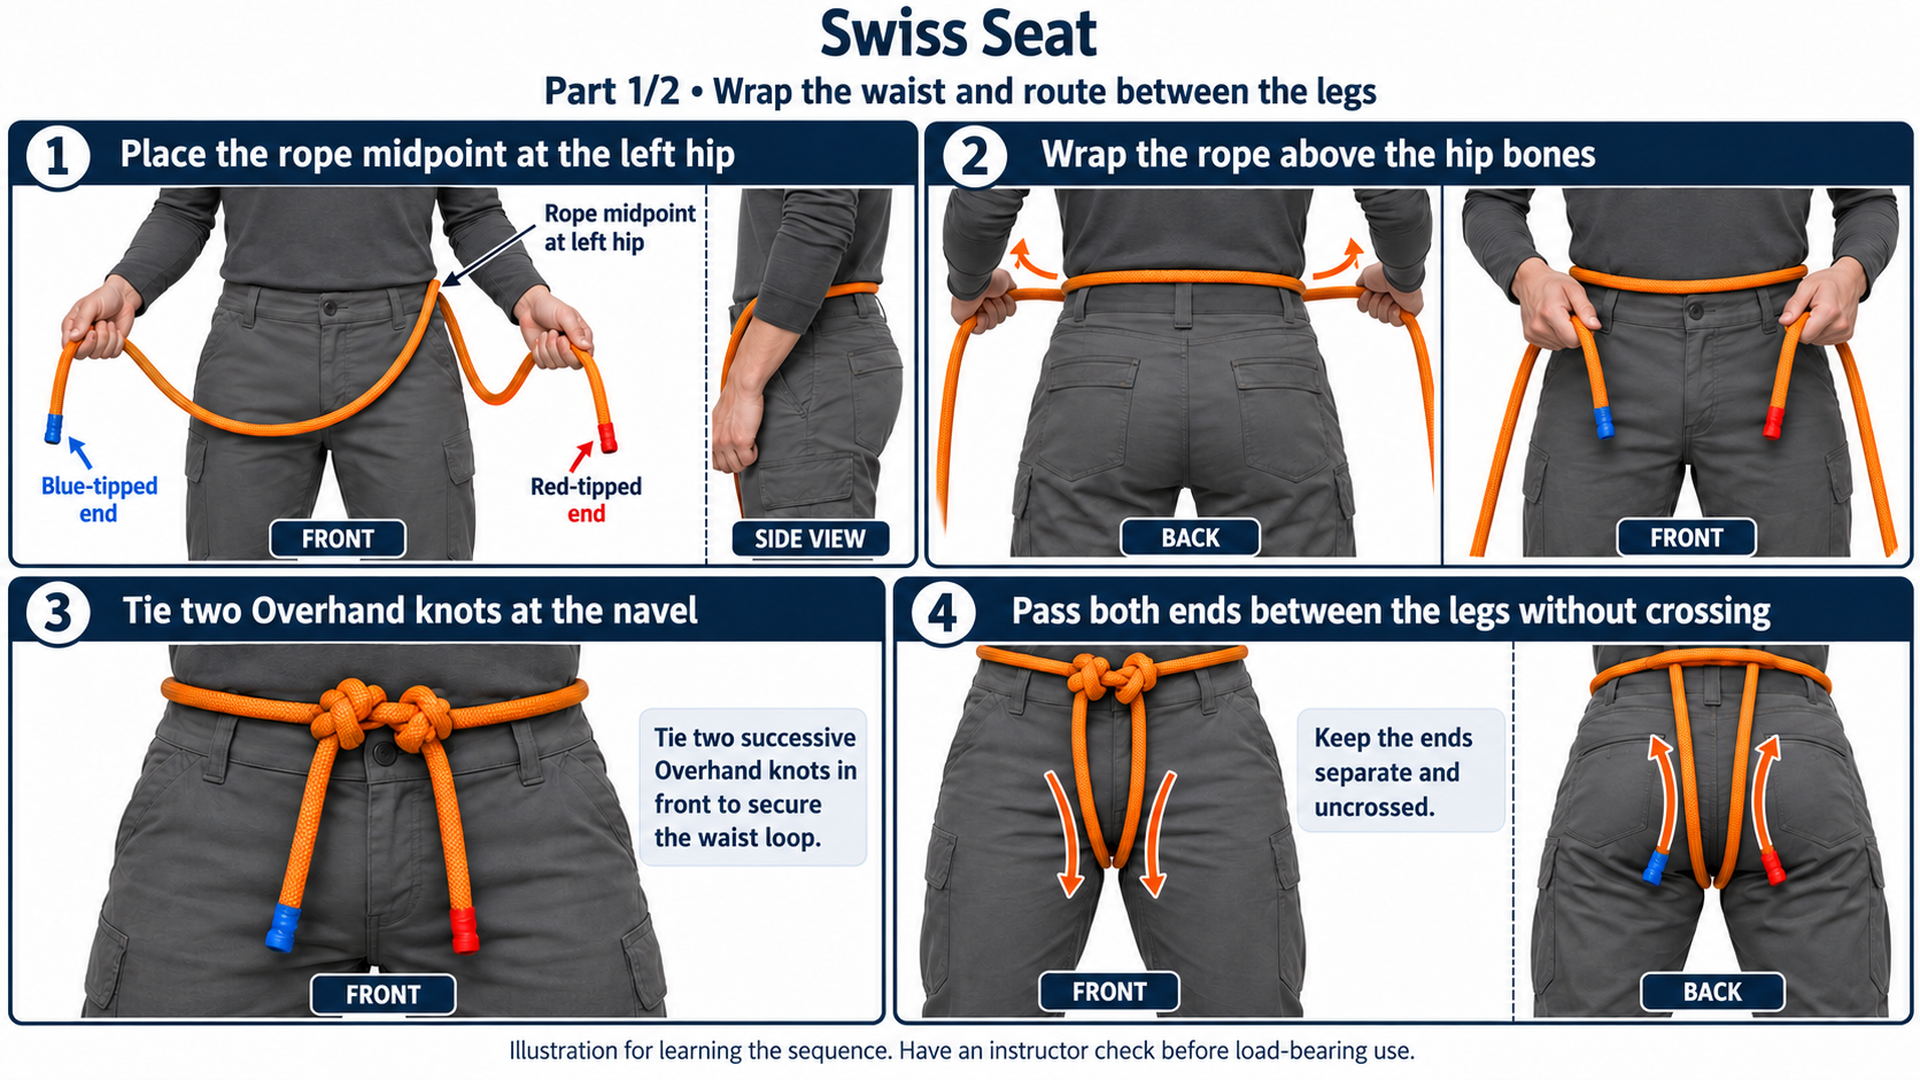
Swiss Seat Part 1 - Source: SIAM Brothers Vietnam
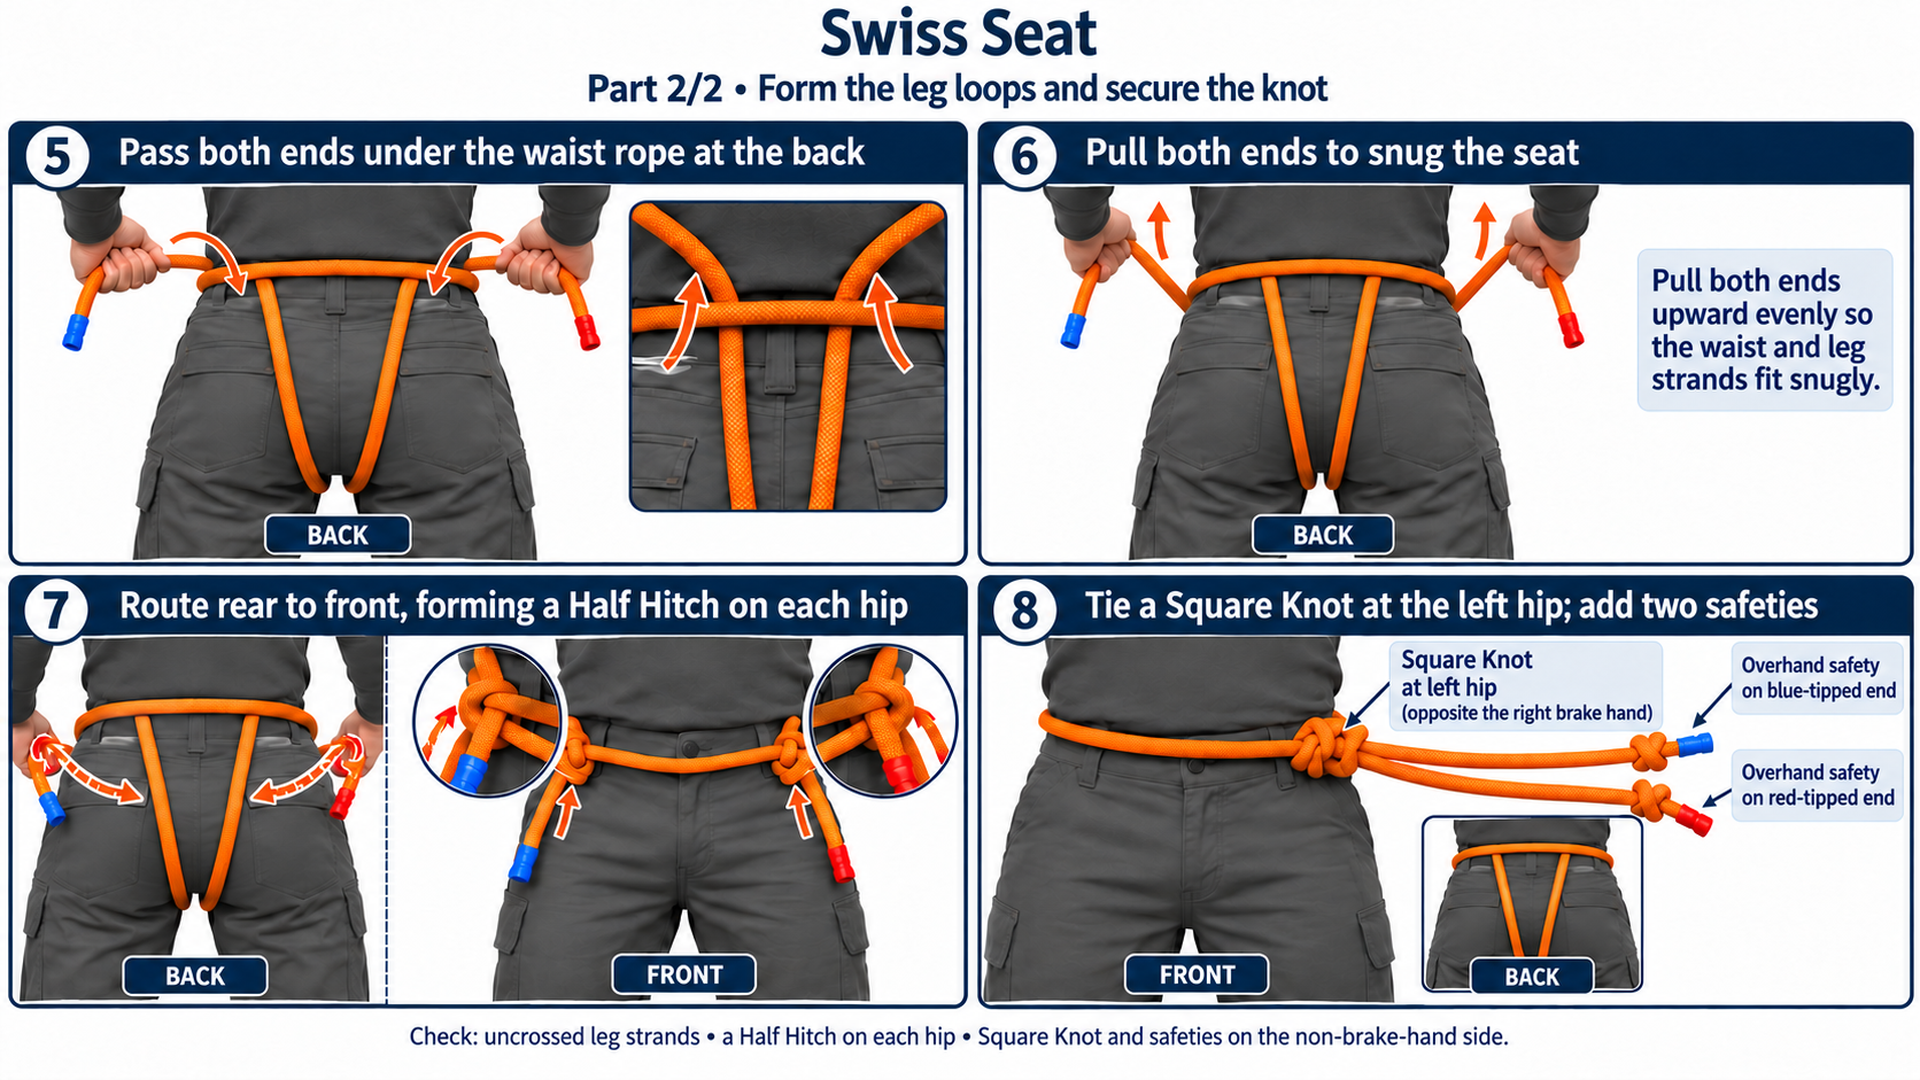
Swiss Seat Part 2 - Source: SIAM Brothers Vietnam
|
What you need to do |
Technique to explore |
|
Make a fixed loop in the middle of a rope |
Alpine Butterfly |
|
Learn how to tie a rope around a suitable post or anchor |
Clove Hitch |
|
Join two rope ends |
Double Fisherman’s Knot |
|
Tie into the designated points on a climbing harness |
Figure Eight Follow Through |
|
Learn about an improvised harness used in rappel training |
Swiss Seat |
To learn how to tie climbing knots, practice each technique with a training rope, follow its animation step by step, and get into the habit of checking the finished knot. For any activity in which a person’s weight depends on the rope, the knot must be part of a suitable system of rope, harness, equipment, and anchors used under qualified instruction.
Further reading: How to store and care for rope properly.
Source: SIAM Brothers Vietnam
FAQ
Q: Which knot should a beginner learn first?
A: You can begin practicing Figure Eight Follow Through and Alpine Butterfly on the ground, then learn other techniques with an instructor as needed.
Q: Can a Clove Hitch be used on its own as an anchor that supports a person?
A: Do not make that decision based on the knot alone. Its use depends on the complete anchor system, direction of loading, and technical guidance.
Q: Can an ordinary utility rope be used for climbing?
A: Use only rope that the manufacturer specifies as suitable for the activity and that is compatible with the other equipment. A rope’s general-purpose use does not establish that it can support a climber.
Q: Can Swiss Seat replace a standard climbing harness?
A: Swiss Seat is an improvised rope seat introduced in training or contingency contexts. Do not use this article alone to make one and rappel without direct instruction and inspection.
Contact us:
Address: 5th floor, VRG Building, 177 Hai Ba Trung Street, Vo Thi Sau Ward, Ho Chi Minh City, Vietnam
Tel: (+84) 28 38 912 889
Hotline: 1800 6129
Facebook: www.facebook.com/siambrothersvn
Email: info@sbg.vn
YouTube: youtube.com/@siambrothersvietnam1728
OA Zalo: zalo.me/1402339229697925373
App SBVN ID:
CHPlay: https://bit.ly/SBVNID-Android
Appstore: https://bit.ly/SBVNID-iOS








Specializing in Agricultural and Fisheries Products & Multipurpose Wire